Jul 27, 2014

0 Comments
Posted in Arrangement , Art , Business

Hazelcast clustering with WSO2 carbon servers in 20 minutes - part 1

Introduction 

While we were at customer site, we were bombarded with above subject. We almost chocked ourselves answering those questions. So, I though of writing a blog post based on the experience  and the knowledge I gained during my on-site engagement. This blog post explains everything you need to know about Hazelcast clustering in a production deployment. 

Why do we need clustering

In a typical enterprise deployment we don't deploy a single instance of a given server as it could result in a single point of failure i.e if the deployed server goes down the complete system will be unusable. Thus we always tend to deploy multiple instances of a given server in order to increase the Availability of a system. 

However, this is only one aspect of this. The other aspect of this is Scalability of a given deployment. In modern enterprise systems a single server instance is not enough to cater the number of incoming request. Therefore, in order to scale we always add more instances to the existing system. This is called Horizontal scaling. Though we could also upgrade server specs such as increasing the memory and CPU speed in order to scale (which we call vertical scaling), there is always a limit and whether we like it or not we have to add more instances to scale.

So it is obvious that we need to have multiple instances of a given server in an enterprise deployment. Needless to say adding more instances adds more complexity to the system. In order to be consistent regardless of numbers servers you've added, you may have to replicate the state and make servers communicate with each other and that is where clustering comes to picture.

Clustering Concepts

Membership discovery phase

When you add a new node to an existing system, it has to convert itself to a member of the existing cluster. A member of a cluster knows about each other in the cluster, which allows that member to change its state to match with other core-existing members. There are two mechanisms to become a member of a cluster. A node can either use Well Known Address (WKA) mechanism or Multicast mechanism. Now what are these ?

Multicast mechanism 

In Multicast a node advertises its details to others using a multicast channel. All the other members get to know about the new node through this multicast channel, which allows them to start communicating with the new node. This allows the node to a become member in the cluster. However, Multicast is not preferred for production deployments as it could add an unnecessary overhead to the network. As a result, it is more often use for testing purposes. 


Well Known Address (WKA) mechanism

In WKA there is a set o well known members and everybody knows about these members. When a node wants to become a member of the cluster, it connects to one of the well known members and declare its details. Then the well known member provides all the information about the cluster and let every member in the cluster know about the new node. This allows the node to become a member of the cluster. This is the widely used membership discovery mechanism in clustering.


Static vs Dynamic membership 

A cluster deployment could have static, dynamic or hybrid members. In a static clustered setup there is a fix set of members and it is not possible to add a new member to the cluster without restarting the system. IP address and port number of static members are predefined.  In a Dynamic clustered setup we can always add new members to the system without restarting. However, in Hazelcast we always use a hybrid clustered setup where we have both static and dynamic set of members. Static members are the well known members who have a predefined IP and port. 

Member's view

Each member in the cluster has its own view of the cluster. Once it discovers the members of a cluster it keeps track of these members. Normally, this is done by maintaining a heart-beat pulse between other members. This way when a member goes down it could detect it and remove that member from the healthy list. However, this is also called unreliable failure detection as members may not respond to the heart-beat request due to the load on that member and not because it is really down. 

Clustering domains

This may not come under general clustering concepts but rather specific to WSO2. In order to identify a cluster we label it with a domain name. Clustering messages will only be sent to the members of that particular domain. In addition to that, this way we can route the traffic only to the relevant set of instances.  For example, let's say there is a load balancer fronted with multiple cluster domains of ESB and BPS. Load balancer will look into the domain mapping and route the message to the specific cluster domain. Therefore, ESB requests are isolated from BPS requests and vise versa. 

Now that you have a basic idea about the concepts of clustering, in part 2 I'll be discussing how to configure WSO2 carbon servers using Hazelcast. 

Mar 15, 2014

0 Comments
Posted in Arrangement , Art , Business

WireTap : An Enterprise Integration Pattern with Message Store and Message Processor

I've always wondered why we needed Sampling Processor when you have Forwarding Processor. Because at first glance it feels like you can do everything that you do with Sampling Processor by using Forwarding Processor. But that is not true. I came-across an interesting integration that made use of Sampling Processor and Forwarding Processor in order to wiretap incoming messages. In fact there is a separate Enterprise Integration Pattern (EIP) for this called Wirtap and this blog post explains a comprehensive implementation of it. In addition to that, as you go through the blog post you will also get to know the nuts and bolts you need to know about Message Store and Message Processor of WSO2 ESB

Requirement : Wiretap It

Basically, what we are trying to archive with this solution is to enable wiretapping for a given Proxy-service with minimal intrusive configurations and performance loss. In simple English, we need to listen to the incoming messages seamlessly. Proxy-service continues to do its intended job while we keep on listing (just like FBI does). Err.. why are we listening ? you ask, this could due to many reasons such as understanding the incoming request, validating it, etc.

Application of Message Store/Message Processor

Here comes the interesting part, the implementation of the above requirement. Let's start with a diagram that depicts the implementation. This will give the initial idea that would make it easier to get a grasp of what I am talking in the next paragraph.  


As you can see there are two Message Stores first one for the Sampling Processor and the second one for the Forwarding Processor. Here's what have done,

  1. Take a copy of the incoming message and store it in a message store. This is done with the clone mediator and the store mediator.
  2. Then takes the message using the sampling processor and do necessary modifications to the message such as adding authentication headers, base64 encoding, etc. Then stores it in the second message store. 
  3. Lastly, take the modified message out using the Forwarding Processor and send it reliably to the back-end. In this case it is a Apache CouchDB
Following is the Synapse configuration of the above design. 

   
      15000


The main sequence for the message mediation org.apache.activemq.jndi.ActiveMQInitialContextFactory tcp://localhost:61616 JMSMS 1.1 org.apache.activemq.jndi.ActiveMQInitialContextFactory tcp://localhost:61616 1.1 JMSMS1 10 storeForward 4 true 1000 10 true

You may wonder why go through such complex implementation. Imaging, you add all the wiretapping logic in the original proxy. It would obviously hinder its original task. The Proxy would get slow which in turn reduces the number of clients it can serve. Moreover, developers will get confused with the original Synapse logic with the new intrusive wiretapping Synapse logic. So that is why this is the better way. 

You can use this Synapse configuration in any given Proxy of yours to start wiretapping (Before that you will have to copy necessary jar files to lib directory). Finally, This also shows the capabilities of WSO2 ESB. An ESB that not only support conventional Enterprise Integration Patterns (EIP) but also novel EIPs such as this. For list of EIPs that WSO2 ESB covers, look at here


Feb 21, 2014

0 Comments
Posted in Arrangement , Art , Business

ESB Performance Round 7.5 - The Other Side of The Story


This blog post explains why the message corruptions stated in “ESB Performance Testing - Round 7” and “Why the Round 6.5 results published by WSO2 is flawed” article are not so catastrophic. Moreover, As you go through the post you’ll understand the fact that, it is written in an absurd manner with overly exaggerated statements. However, with this blog post I don’t really intend to play the same game of theirs but to clear any possible misunderstandings that were caused by those articles. 

Fastest open source ESB in the world


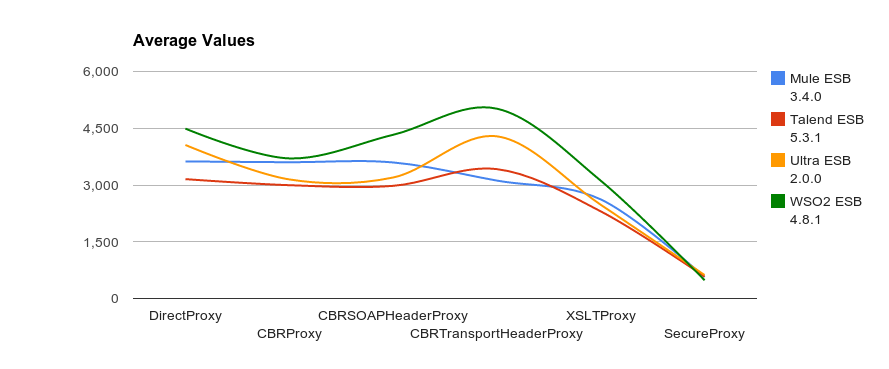
Latest performance study conducted by WSO2 ESB team has clearly showed that WSO2 ESB has continued to be the leader in the space of ESB performance. Geared with latest technology and a dedicated team, WSO2 ESB always provides nothing but the best for its users. Following graph shows the summary of the latest results. For more information please refer Performance round 7.5.


However, There have been some invalid critics on the Net which gives the message that WSO2 ESB fails to deliver. This message is entirely not true and below paragraphs explain why. 

The extinct issue of StreamingXpath 


We must admit that enabling StreamingXpath did lead into a message corruption when the message size is larger than 16K. While there was a real issue here, this was never a default configuration and has NOT really affected the thousands of real deployments of WSO2 ESB out there. Furthermore, this has been stabilised in the recently released WSO2 ESB 4.8.1 as it continues to be the fastest open source ESB.

XSLT and FastXSLT false alarm


XSLT and FastXSLT mediators never had a problem of message corruption. The message corruptions that were seen in Performance round 7 were due to a missing Synapse configuration. Given the fact that, the engineers who conducted the performance test were ex-WSO2 ESB team engineers, they could have easily figured it out and fixed it during the Performance round 7. Plus, they could have informed us about this prior to the test. So that we could have fixed it for them. 

They failed to do neither of these. So, as they have mentioned, their peformance test does have inherent limitations due to their limited understanding. Therefore, it cannot be attributed as a message corruption of WSO2 ESB 4.6 or WSO2 ESB 4.7.0. 

Stability of Passthrough Transport (PTT)


Over the last year WSO2 ESBs with PTT were deployed in many customer sites and they have never encountered any significant issues but rather benefited from high performance of deployed ESBs as the deployment only required very few instances of ESBs. 

To clear any confusions PTT never had message corruption problems but instead StreamingXpath which is written on top of PTT in order to utilize its high performance architecture.

Nothing to Worry


After all, As above section explains message corruptions that were discussed in performance round 7 are either occurs in extreme situations or never really exist. Therefore, we believe the content of the article performance round 7 is more or less misleading the audience. However, StreamingXpath did have a problem with messages larger than 16K which is fixed in ESB 4.8.1. Apart from that there aren’t any message corruptions issues at all.

Lastly, The only other critic that worth answering is why we didn’t publish the AMI. Yes, we didn’t publish the AMI but we did publish the configuration files along with clean and clear instructions to re-setup setup if needed. So, If one wants to reproduce the result they can simply re-setup the setup. Besides, Even if we had published the AMI, one would have to load this AMI into an EC2 instance which is always not guaranteed to be the same. 

As a conclusion, Most of the things that have been published in those articles are trivial stuff and just overly exaggerated to make a big thing out of nothing. However, I must admit some of the critics they have mentioned were really helpful for us to improve our product and I am grateful to them for those.

Feb 14, 2014

0 Comments
Posted in Arrangement , Art , Business

Advancing Integration Competency and Excellence with the WSO2 Integration Platform


I am glad that WSO2Con Asia 2014 is held in Sri Lanka. Undoubtedly, It is like the biggest SOA (Service Oriented Architecture) conference that ever held in Sri Lanka. Not only you get to learn anything and everything about SOA but also you get to learn it with hands-on sessions. We all know that best way to learn something is to try it out yourself. So, this is the very best reason why you should attend the tutorial session on "Advancing Integration Competency and Excellence with the WSO2 Integration Platform" done by Dushan and Shammi

Mainly, this tutorial session will be focused on the followings,
  • New WSO2 ESB Cloud Connectors
  • New RESTful Integration capabilities
  • Store and Forward and advanced integration patterns
These are some of the latest additions that were done to our ESB. If you find these words unfamiliar, don't worry!. Because you will get to learn from the best. Just to get you started, I'll give a brief introduction on main topics. 

Let's start with WSO2 ESB Cloud Connectors


Here, the million dollar question would be what is a cloud connector ? right. In a sentence "A connector is a ready made and convenient tool to reach publicly available Web API’s". For instance, we have connectors for SalesForce, Google Spreadsheet, Twitter, etc. These connectors allow you to do rapid and easy integration of different APIs to meet business needs. For instance, you can take data from SalesForce and present it Google SpredSheet in minutes. There is no need to write a single code. In fact, it is just a matter of drag and drop from DevStudio. Furthermore, If you don't like these connectors you can write your own connectors. So, in this tutorial you will get use and write connectors. 

New RESTful Integration capabilities


REST is like the next big thing when it comes to integration. Not only it is simple and easy with its "verbs" and "nouns" but also it gives you the liberty of using fat free message types such as JSON, POX, etc as opposed to Web Services. In this tutorial session you will find out that how easy it is to do integration in RESTful manner using WSO2 ESB. To make your life even more easier, the new versions of ESB has enhanced JSON support such as Natural JSON and JSON path. Thefore, this is a tutorial session that shouldn't be missed.

Store and Forward and advanced integration patterns


Though Store and Forward support has been there for some time. We though of revamping its implementation from scratch to cater the modern needs in integration. Store and Forwarding not only helps you to throttle messages but also to archive guaranteed delivery. With this you can do advance EIPs (Enterprise Integration Pattern) such as DLC (Dead Letter Channel) and many more. Moreover, you will get hands-on experience on new features of Store and Forward and its usage in EIPs.

These are the main focuses of this tutorial session. So get involved and you will start to see a set of whole new possibilities in the space of Integration. This could take your organization to the next level. Remember, this is only about a tutorial session. There are series of interesting sessions lined up in WSO2Con Asia 2014. For more information see WSO2Con Asia 2014 official website.


Feb 12, 2014

0 Comments
Posted in Arrangement , Art , Business

WSO2 ESB Passthrough Transport Basics

When I first joined WSO2 I found it hard to get a grasp of this so-called "Passthrough Transport". All I knew was it was fast! as opposed to "nhttp transport" (I hadn't known anything about it either). However, over the past year I gradually get to understand what is this Passthrough transport and why it was so fast. So, In this blog post I'll be explaining some "good-to-know" stuff about "Passthrough Transport". Since I am no expert on this, there could be few gaps. But still better than nothing.

Passthrough Transport Vs NHTTP Transport

The main difference is, in Passthrough Transport the incoming message does not get built all the time whereas in NHTTP Transport it always gets built. What we meant by building the message is we take the message stream from the socket and transform it in to a XML representation. 

In reality, you don't always have to build the message. For instance, you maybe able to rout the message simply by looking at the headers of HTTP request. So rather than blindly building the message Passthrough Transport does this selectively which makes it smarter than its predecessor NHTTP Transport.

The main similarity between these two is they are both developed on top of the popular Apache project HTTP-core.

High level view of Passthrough Transport

OK, Now that you have an idea, let's look at high level view this transport.


It is not as simple as the diagram depicts but it is enough to get you started. In a way, Passthrough Transport is a complex implementation of Producer-Consumer pattern. Why I say so, Let me explain. Everything starts from the SourceHandler side. When a client sends a request it comes through HTTP-Core towards SourceHanlder. Then the SourceHandler starts producing data to the Pipe. As soon as SourceHanlder starts producing data to the Pipe TargetHandler starts consuming data from the Pipe. These consumed data are sent through HTTP-Core to the desired endpoint. 

As I said earlier it is not as simple as that. There are quite a lot of classes associated with the process such as ServerWorker, SourceRequest, SourceResponse, ClientWorker, TargetResponse, TargetRequest, etc. To make matters worse, the entire implementation is done in Asynchronous manner.

State Machine of Passthrough Transport

So in order to reduce the complexity of the entire process it is implemented on a state machine. SourceHanlder and TargetHanlder have their separate state machines. Following is the state machine that used by them.


The vertical split represents the SourceHandler side and the TargetHandler side. The horizontal split represents the HTTP request and HTTP response. The methods that are next to each state are the methods that get executed in each state (Forget the methods for the moment). Before I explain the state machine it is important to know that in Passthrough the HTTP message is divided into two parts and as HEADERs and BODY. 

This is how it goes, First ESB establishes the connection with the Client and sets its state to REQUEST_READY. Then it starts receiving data. First it reads the headers and goes to REQUEST_HEAD state. Afterwards, it makes itself ready to read the body of the message in the REQUEST_BODY state. Finally to finish the first quarter it reads the entire message body and moves to REQUEST_DONE state. 

The same thing continues in the next quarter but this time ESB acts as the client to some back-end server.  And in the last two quarters it happens for the response. The states of the SourceHandler and the TargetHanlder are interconnected through Pipe's buffer. So sometimes when you debug, though the error message shows in TargetHandler side the actual cause could be on the other side. 

Exact Location of Passthrough Transport

Following diagram shows the location of the Passthrough Transport in the ESB architecture.


Finally, THIS STATE MACHINE REPRESENTS AN IDEAL SCENARIO. But in real world it could deviate a bit from this. Moreover, this blog post is only covering a small bite of a complex implementation. Anyways, this knowledge is enough to get you started. 


Feb 2, 2014

0 Comments
Posted in Arrangement , Art , Business

Exchanging SAML2 token to OAuth2 token in WSO2 Platform

This is something I came-across while I was on my first QSP. There can be situations where you need to exchange SAML2 to OAuth2 token. In our case, we authenticate users using SAML2 and then authorize APIs on behalf of the user using OAuth2. In this blog post, I'll be walking through how this type scenario can be handled using WSO2 products [1]. In fact, I'll be using WSO2 Identity Server, WSO2 ESB and WSO2 API Manger. Firstly, lets start with the deployment diagram. So, that everyone can get a grasp on how these components are connected to each other and the order of the communication.

As depicted in the image. User get authenticated with SAML2 token and then Service Provider exchanges it to OAuth2 token using the API manager. Now let's see how to configure these components to archive this [2].


STEP 1 - Configure Identity Server (IS 4.6.0)

Register the Service Provider as in the image for authenticating using SAML2. For more information refer link [3]. For Assertion Consumer URL enter http://localhost:8080/travelocity.com/samlsso-home.jsp and be cautious not to forget to select wso2carbon for Certificate Alias. 


STEP 2 - Configure API Manager (APIM 1.6.0)

In this example, we will be configuring all the products in one machine. Therefore, Let's in crease port offset by 2. In order to do that open <APIM_HOME>/repository/conf/carbon.xml and set the port set as below. Now start the APIM.

<!-- Ports offset. This entry will set the value of the ports defined below 
to the define value + Offset.  e.g. Offset=2 and HTTPS port=9443 will
set the effective HTTPS port to 9445 -->
<Offset>2</Offset>

After that in APIM go to configur and click on Trusted Identity Providers. There fill the fields as in the below image.


For the Identity Provider Public Certificate there are two important things to do. First, we need to generate a certificate and then we need to add that certificate to JAVA trusted certificates. So, please issue following commands accordingly. 

  • keytool -export -alias wso2carbon -keystore <IS_HOME>/repository/resources/security/wso2carbon.jks -storepass wso2carbon -file mycert.pem
  • keytool -import -trustcacerts -file <IS_HOME>/repository/resources/security/mycert.pem -alias wso2carbon -keystore $JAVA_HOME/jre/lib/security/cacerts

STEP 3 - Modifying Service Provider  (travelocity.com)

In travelocity.com when you fist get authenticated with SAML2 you get the SAML2 token. Therefore, Using that SAML2 token you are going to get the OAuth2 token. So, that is what done in the below code snippet.

Exchanging SAML2 token to OAuth2 token


 // Get the SAML2 Assertion part from the response
StringWriter rspWrt = new StringWriter();
XMLHelper.writeNode(samlResponse.getAssertions().get(0).getDOM(), rspWrt);
String requestMessage = rspWrt.toString();

// Get the Base64 encoded string of the message
// Then Get it prepared to send it over HTTP protocol
String encodedRequestMessage = Base64.encodeBytes(requestMessage.getBytes(), Base64.DONT_BREAK_LINES);
String saml2assertion = URLEncoder.encode(encodedRequestMessage,"UTF-8").trim();

String urlParameters = "grant_type=urn:ietf:params:oauth:grant-type:saml2-bearer&assertion=" + saml2assertion + "&scope=PRODUCTION";

//Create connection to the Token endpoint of API manger
url = new URL("https://localhost:9445/oauth2/token");

connection = (HttpURLConnection)url.openConnection();
connection.setRequestMethod("POST");
connection.setRequestProperty("Content-Type", "application/x-www-form-urlencoded;charset=UTF-8");
// Set the consumer-key and Consumer-secret
connection.setRequestProperty ("Authorization", "Basic " + Base64.encodeBytes(("0P6YbqXQHwS38rTJ5wIzzrIUgNga:HosDgUAhLrgoZh2Ts_L2nrzf4V0a").getBytes(), Base64.DONT_BREAK_LINES));
connection.setUseCaches(false);
connection.setDoInput(true);
connection.setDoOutput(true);

//Send request
DataOutputStream wr = new DataOutputStream (connection.getOutputStream());
wr.writeBytes (urlParameters);
wr.flush ();
wr.close ();

//Get Response
InputStream is = connection.getInputStream();
BufferedReader rd = new BufferedReader(new InputStreamReader(is));

String line;
StringBuffer response = new StringBuffer();
while((line = rd.readLine()) != null) {
   response.append(line);
   response.append('\r');
}

rd.close();
return response.toString();

As you may have already noticed you need a consumer key and a consumer secret in order to get the OAuth2 token. So this consumer key and consumer secret are retrieved when you get subscribed to a particular API available in the APIM store.
Following is an sample SAML2 Assertion which was taken from SAML2 token. As mentioned in the code snippet, you only need this part to get OAuthe2 token.


<saml2:Assertion xmlns:saml2="urn:oasis:names:tc:SAML:2.0:assertion" ID="lkombgamkgmffhiaphjlipbgdmlnigdgbgmhidpi" IssueInstant="2014-01-16T15:20:09.230Z" Version="2.0">
   <saml2:Issuer Format="urn:oasis:names:tc:SAML:2.0:nameid-format:entity">https://localhost:9443/samlsso</saml2:Issuer>
   <ds:Signature xmlns:ds="http://www.w3.org/2000/09/xmldsig#">
      <ds:SignedInfo>
         <ds:CanonicalizationMethod Algorithm="http://www.w3.org/2001/10/xml-exc-c14n#" />
         <ds:SignatureMethod Algorithm="http://www.w3.org/2000/09/xmldsig#rsa-sha1" />
         <ds:Reference URI="#lkombgamkgmffhiaphjlipbgdmlnigdgbgmhidpi">
            <ds:Transforms>
               <ds:Transform Algorithm="http://www.w3.org/2000/09/xmldsig#enveloped-signature" />
               <ds:Transform Algorithm="http://www.w3.org/2001/10/xml-exc-c14n#" />
            </ds:Transforms>
            <ds:DigestMethod Algorithm="http://www.w3.org/2000/09/xmldsig#sha1" />
            <ds:DigestValue>CaY1tbi2kfzCqnJARZBs9I6C690=</ds:DigestValue>
         </ds:Reference>
      </ds:SignedInfo>
      <ds:SignatureValue>dOExwKi/lAW7nzb2JCyLJCAppI9sgb0qZDayQcNeiSqv3gjRmsOcfxYyeVZhUaqHuOpqCqWwLQDQ
i4BUINMdlBsw8y2iZH7bhcfUgDIj26PNBlFtZthmX3ERr4leCm0NIo0jt+cVry3BSEO7duamNq3J
ZPIultt6SZWTsfk4nn8=</ds:SignatureValue>
      <ds:KeyInfo>
         <ds:X509Data>
            <ds:X509Certificate>MIICNTCCAZ6gAwIBAgIE...<removed for bravity>...O4d1DeGHT/YnIjs9JogRKv4XHECwLtIVdAbIdWHEtVZJyMSktcyysFcvuhPQK8Qc/E/Wq8uHSCo=</ds:X509Certificate>
         </ds:X509Data>
      </ds:KeyInfo>
   </ds:Signature>
   <saml2:Subject>
      <saml2:NameID Format="urn:oasis:names:tc:SAML:1.1:nameid-format:emailAddress">admin</saml2:NameID>
      <saml2:SubjectConfirmation Method="urn:oasis:names:tc:SAML:2.0:cm:bearer">
         <saml2:SubjectConfirmationData InResponseTo="0" NotOnOrAfter="2014-01-16T15:25:09.230Z" Recipient="http://localhost:8080/travelocity.com/samlsso-home.jsp" />
      </saml2:SubjectConfirmation>
   </saml2:Subject>
   <saml2:Conditions NotBefore="2014-01-16T15:20:09.230Z" NotOnOrAfter="2014-01-16T15:25:09.230Z">
      <saml2:AudienceRestriction>
         <saml2:Audience>travelocity.com</saml2:Audience>
         <saml2:Audience>https://localhost:9445/oauth2/token</saml2:Audience>
      </saml2:AudienceRestriction>
   </saml2:Conditions>
   <saml2:AuthnStatement AuthnInstant="2014-01-16T15:20:09.230Z" SessionIndex="28350436-898a-42c4-975f-e8b5aba01d9a">
      <saml2:AuthnContext>
         <saml2:AuthnContextClassRef>urn:oasis:names:tc:SAML:2.0:ac:classes:Password</saml2:AuthnContextClassRef>
      </saml2:AuthnContext>
   </saml2:AuthnStatement>
</saml2:Assertion>

Making the Service Call

Now you have everything that you need for the legitimate service call. All you have to do is use the retrieved OAuth token to make service call. Following code snippet shows how it is done.

// Create the connection to desired API
url = new URL("http://localhost:8282/datadelete/1.0.0");
            
connection = (HttpURLConnection)url.openConnection();
connection.setRequestMethod("POST");
connection.setRequestProperty("Content-Type", "application/json");
// Using the OAuth token
connection.setRequestProperty ("Authorization", "Bearer " + request.getSession().getAttribute("access_token"));
connection.setUseCaches(false);
connection.setDoInput(true);
connection.setDoOutput(true);

//Send request with the required payload
DataOutputStream wr = new DataOutputStream (connection.getOutputStream());
wr.writeBytes ("{\"Request\":{\"DeviceID\":\""+ request.getParameter("device") +"\"}}");
wr.flush ();
wr.close ();

//Get Response
InputStream is = connection.getInputStream();
BufferedReader rd = new BufferedReader(new InputStreamReader(is));

String line;
while((line = rd.readLine()) != null) {
    rsp.append(line);
    rsp.append('\r');
}
rd.close();

return rsp.toString();

So that is it. That's how you can exchange SAML2 token to OAuth2 token in WSO2 platform. Anyways, you might be wondering why there is an ESB. The actually backend service is hosted in ESB and then exposes using API manager.

You can also exchange the SAML2 token to OAuth2 token just using the IS instead of APIM [4].

See Also


[1] http://docs.wso2.org/dashboard.action
[2] http://docs.wso2.org/display/AM160/Token+API
[3] http://docs.wso2.org/display/IS460/Configuring+SAML2+SSO
[4] http://docs.wso2.org/display/IS450/SAML2+Bearer+Assertion+Profile+for+OAuth+2.0


Jan 26, 2014

0 Comments
Posted in Arrangement , Art , Business

Minimal configurations for sending mails using the terminal


This is something I came across while I was doing the performance test for our ESB. Performance test for the ESB took some time and had some output files. I wanted this output files after each iteration. However, It is not good to longing to the machine while the performance test is on going. Therefore, I wanted a notification system to notify me and send the files after each iteration. In order to archive this I used mails with attachments.

Like this there could be many scenarios where you have to send mails as a notification. This blog post shows how to configure and send mail using the terminal withing minutes.

MSMTP as the MSA (Message Sending Agent)

First thing we need to do is installing and configuring a MSA. For this I have chosen msmtp. Issue the following command to install msmtp.

sudo apt-get install msmtp

Then configure it to send mails. In my case I have used gamil for sending mails. In order to configure it first you need to change permission of the file ~/.msmtprc. To do this issue the following commands.

touch ~/.msmtprc
chmod 0600 ~/.msmtprc

Now you can configure it for sending mail with gmail as follows.

# Use an external SMTP server with insecure authentication.
# (manually choose an insecure authentication method.)
# Note that the password contains blanks.
defaults
######################################################################
# A sample configuration using Gmail
######################################################################
# account name is "gmail".
# You can select this account by using "-a gmail" in your command line.
account gmail
host smtp.gmail.com
tls on
tls_certcheck off
port 587
auth login
from <your gmail address>
user <username (I normally use the from value for this)>
password <password>
# If you don't use any "-a" parameter in your command line,
# the default account "someplace" will be used.
account default: gmail

Mutt as the mail sender

Though we can use msmtp to send mails, it is better to use something like mutt because it provides convenient options when your sending a mail such as sending attachments. However, mutt itself could not send mails. It needs a MSA such as msmtp.

Let's install mutt first.

sudo apt-get install mutt

Then configure it to use msmtp as its MSA.

vim ~/.muttrc
set sendmail="/usr/bin/msmtp"
set from=<your gmail address>

That's it. You are ready to go. Now issue the following command to test sending mails with attachments. 

echo "body." | mutt -d 1 -s "attachment" aaa@bbb.com -a abc.zip

Replace aaa@bbb.com and abc.zip as you wish and hit enter. There should be a mail in the destination mail with the subject attachment. 


    Blogger news

    Blogger templates

    Blogroll

    About