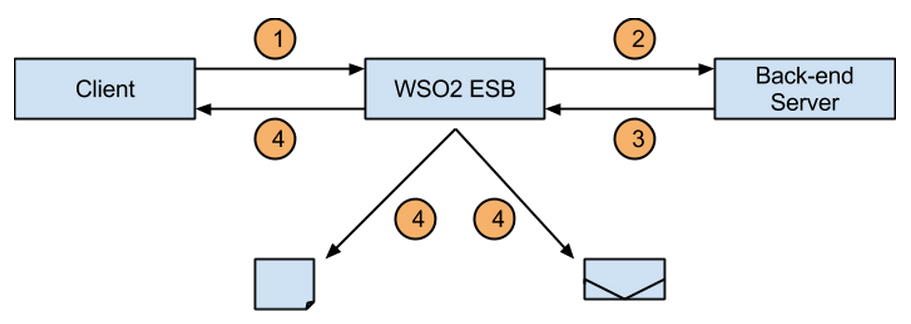
This article shows you how to save a back-end respond to a file and send a confirmation e-mail before you send it to the client. This sort of scenario would be useful when you need to keep track of messages that you've sent to the front-end as an assurance. Following diagram depicts this scenario.
Now lets look at the synapse configurations that implements this scenario.
<?xml version="1.0" encoding="UTF-8"?>
<definitions xmlns="http://ws.apache.org/ns/synapse">
<proxy name="StockQuoteProxy"
transports="https http"
startOnLoad="true"
trace="disable">
<target>
<inSequence>
<send receive="ResponseChain">
<endpoint>
<address uri="http://localhost:9000/services/SimpleStockQuoteService"/>
</endpoint>
</send>
</inSequence>
</target>
<publishWSDL uri="file:repository/samples/resources/proxy/sample_proxy_1.wsdl"/>
</proxy>
<sequence name="ResponseChain">
<clone>
<target>
<sequence>
<property name="transport.vfs.ReplyFileName"
expression="fn:concat(fn:substring-after(get-property('MessageID'), 'urn:uuid:'), '_msg.xml')"
scope="transport"/>
<property name="OUT_ONLY" value="true"/>
<property name="transport.vfs.ContentType"
value="text/xml"
scope="transport"/>
<property name="ClientApiNonBlocking" scope="axis2" action="remove"/>
<send>
<endpoint>
<address uri="vfs:file:///home/shafreen/work/blog/in"/>
</endpoint>
</send>
</sequence>
</target>
<target>
<sequence>
<log level="custom">
<property name="SENDING EMAIL" value="SENDING EMAIL"/>
</log>
<property name="Subject"
value="ORDER PURCHASE CONFIRMATION"
scope="transport"/>
<property name="OUT_ONLY" value="true"/>
<property name="messageType" value="text/plain" scope="axis2"/>
<property name="msgID" expression="get-property('MessageID')"/>
<script language="js">var msgID = mc.getProperty("msgID");
mc.setPayloadXML(<h1>For message id : {msgID}</h1>);</script>
<send>
<endpoint>
<address uri="mailto:shafreen@wso2.com"/>
</endpoint>
</send>
</sequence>
</target>
<target>
<sequence>
<send/>
</sequence>
</target>
</clone>
</sequence>
<sequence name="fault">
<log level="full">
<property name="MESSAGE" value="Executing default "fault" sequence"/>
<property name="ERROR_CODE" expression="get-property('ERROR_CODE')"/>
<property name="ERROR_MESSAGE" expression="get-property('ERROR_MESSAGE')"/>
</log>
<drop/>
</sequence>
<sequence name="main">
<log/>
<drop/>
</sequence>
</definitions>
Now let's look into the details of this synapse configuration. Just to make it nice and concise I have broken this explanation into some sub topics. On more thing that worth mentioning is that I have used the sample 150 as the basis for this synapse configuration. So if you want get your hands dirty before go into the details just follow the sample and then do the necessary tweaks.
Axis2 Configurations
Before we do anything it is important un-comment the following sections in the axis2.xml which will enable the required transports.
VFS transport sender
<transportSender name="vfs" class="org.apache.synapse.transport.vfs.VFSTransportSender"/>
Mail transport sender
<transportSender name="mailto" class="org.apache.axis2.transport.mail.MailTransportSender">
    <parameter name="mail.smtp.host">smtp.gmail.com</parameter>
    <parameter name="mail.smtp.port">587</parameter>
    <parameter name="mail.smtp.starttls.enable">true</parameter>
    <parameter name="mail.smtp.auth">true</parameter>
    <parameter name="mail.smtp.user">email@host.com</parameter>
    <parameter name="mail.smtp.password">password</parameter>
    <parameter name="mail.smtp.from">email@host.com</parameter>
</transportSender>
Proxy service
First thing first, Whenever there is a request first it hits the in-sequence of the proxy service. As you can see this proxy service doesn't do much. It simply sends the client's request to the back-end service. In this case it's the well-known SimpleStockQuoteService. However, there are few things to learn from it. First thing to notice is that it does not have a in-sequence but instead it has used message chaining. This is done by associating a receive sequence by adding to sends mediator's receive attribute. So now when there is a response it goes to this sequence. Then inside this sequence you do whatever you wanna do. So next section explains what happens inside the chained sequence.
Chained Sequence
In this example ResponseChain sequence is the chained sequence. As I said before, when there is a response the response goes through this sequence. So now let is what actions do occur when a response goes through this sequence.
Firstly, it hits the clone mediator which will start three separate threads for each target with three cloned messages one for each. Therefore, these targets are independent from each other. So next part explains the first target.
First target
Basically, this just save the response to a file. As you can see,
transport.vfs.ReplyFileName property uses a unique file name for each message if not so previous message content would be replaced by the new message content.
OUT_ONLY property makes sure ESB does not expect a response as we do not expect a response.
transport.vfs.ContentType set the content type of the message. Though it is not that important in this case, it could vital when you send the message to a back-end service. Last but not the least,
ClientApiNonBlocking property makes sure that Axis2 won't spawn a new thread for the out-going message. The reason for setting this is we already have spawned a thread as I explained earlier so there is no need to do so. Now that every thing is set we can write the file to the desired endpoint that is done by using the send mediator.
Second target
This target just simply sends a confirmation e-mail. Since most of the properties quite intuitive, I am not gonna explain those properties. However, There is one thing to highlight and that is setting the messageType property. Based on how you have set this property receiver will decide either to have the message as an attachment or simply display it. Anyway, above settings cause the receiver to display message on the browser.
Third target
Finally the third target completes the cycle by sending the response to the client who initiated the request. If this is not in place this client would not get any response from the ESB. So it's important place it there.
That's about it for more information about the VFS transport try the below links.


.png)

