Aug 20, 2013

0 Comments
Posted in Arrangement , Art , Business

Streaming real-time stock market feeds with webscokets

This is something related to my first job. I was lucky enough to work on an amazing project where I had to write a stand-alone server component that had to stream stock market data to Rich Internet Applications (RIA). In order to do so we used a workaround called long-polling and websockets. This article explains what, why, and when of websockets and how it solved the problem that we were facing.


What is websockets ?

It looks like a new type of a TCP socket, doesn't it. But it’s not -- it is a new protocol that is designed to stream data using port 80 and port 443 and it comes as a part of HTML5. In other words websocket is a TCP socket with some added constraints. As I said earlier, unlike TCP sockets websockets can operate on standard web ports. Therefore there is no hassle of opening ports for applications, no need to worry about firewalls and virus-guards and etc. So this was ideal for us as we had to stream data to our RIAs.

Why websockets ?

In early days websites were just used to share information. All most all the websites only included words and images and there were no such things called commercial websites. Moreover, when it came to hardware, web servers had limited memory and storage yet it had to scale to serve a large number of users. So to cope with these requirements engineers came up with a protocol called HTTP. This was purely based on request/response paradigm. Whenever there is a new request web server creates a new socket and serves the request with a response and as soon as the response is sent server closes the socket and reacquires the resources that were allocated. This was fine before people came up with RIAs which gave birth to a large number of commercial websites. As time went on both software and hardware kept on evolving. Now with the help of AJAX and SOAP web applications are able to send asynchronous request to web servers. In addition, web servers are now rich with memory, storage and high processing power. This provided the perfect platform for RIAs and consequently RIAs became more and more like stand-alone applications. This is the point where HTTP became inadequate and this gave birth to websockets. In our case we had a RIA which presents stock market data and then allow users to trade their stocks. 

How websockets work ?

Before people invent websocket protocol there was no straight-forward way of streaming data on standard web ports. Therefore we used something called long-polling. As you may know, polling is the action of continuously checking some condition to see if some event has occurred. Long-polling is a slight deviation of this. Instead of implementing this we used a framework called CometD. But this has a major problem, though this manage to create the illusion of streaming data on top of a request/response model, this consumes a lot of bandwidth. So as a solution for this we used websockets which also comes with CometD framework. A lot of people tend to misunderstand that websocket is a replacement to HTTP. Actually, it is not but instead it is a complement to HTTP (or at least for now). Following, diagram depicts how a websocket communication is initiated. 


As you may have noticed, initial websocket handshake is done using HTTP. Then upon successful handshake both web client and server upgrade their communication protocol to websocket. Thereafter communication is done using websocket frames. The other thing to notice from the diagram is websocket communication does not have to be request/response. Websocket frames can flow back and forth as they wish like a normal TCP socket connection. Initial handshake request which is sent using HTTP protocol has to include certain header fields such as origin header, http compliant version header, websocket subversion header and so on. These headers and frames can be seen with the help of google-chrome's developer tool and you can try this out using link [3] which is a demo site to check websocket communication. Now let’s look at a webscoket frame. I took this image from link [2].


You can find more information about websocket frames in link [2]. However, websocket is not a silver bullet. There are several issues that websockets had to overcome. One of the main problems that websockets itself come-across is security vulnerability such as cross-origins attacks and proxy cache poisoning. Anyway, cross-origin attacks are tackled by adding an origin header which indicates the origin of the request. Proxy cache poisoning attacks are handled by masking frames which are sent by the client. Apart from these issues there is a different type of problem. That is, most of the existing proxy servers does not support websockets. When we hosted the server in United Kingdom and tried to establish a websocket connection using a browser in Sri Lanka, it failed saying bad request. This was due to intermediary proxy servers didn’t understand the protocol. As a solution for that we tried to initiate a websocket connection using HTTPS which intern upgrades to WSS and as we expected connection was successfully established. But this has the overhead of encryption. But we were happy to live with it as this saved a lot of bandwidth. Even in link [2] it says there is around 80 percent of success rate if we use wss instead of ws for communication. Lastly, only the latest browsers support web-sockets like Firefox latest version, chrome latest version and IE10.

When to use websockets ?

I think the answer to this question is pretty clear by now if you have read the article from the beginning. Though websockets are great when it comes to streaming data. It is not as matured as HTTP. Moreover, This can be used to create highly interactive web applications such as chat applications and online web based IDEs. However, when it comes to streaming data such as stock market updates using standard web ports, websockets are the only feasible solution as it saves a lot of bandwidth with less latency. 


References


May 9, 2013

0 Comments
Posted in Arrangement , Art , Business

WSO2 ESB VFS and Mail transport with Clone mediator

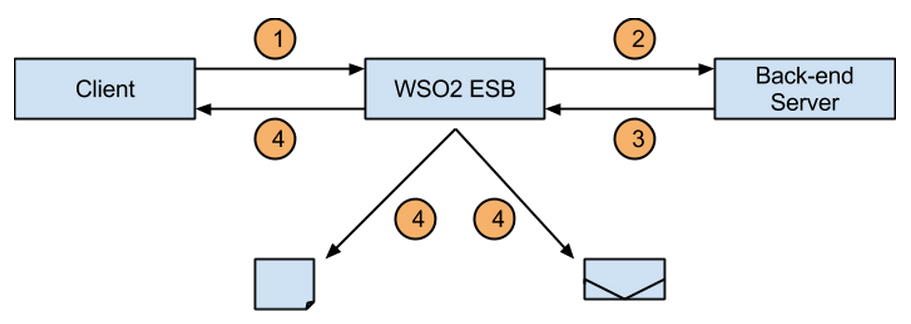
This article shows you how to save a back-end respond to a file and send a confirmation e-mail before you send it to the client. This sort of scenario would be useful when you need to keep track of messages that you've sent to the front-end as an assurance. Following diagram depicts this scenario.


Now lets look at the synapse configurations that implements this scenario.
<?xml version="1.0" encoding="UTF-8"?>
<definitions xmlns="http://ws.apache.org/ns/synapse">
   <proxy name="StockQuoteProxy" 
          transports="https http"
          startOnLoad="true"
          trace="disable">
      <target>
         <inSequence>
            <send receive="ResponseChain">
               <endpoint>
                  <address uri="http://localhost:9000/services/SimpleStockQuoteService"/>
               </endpoint>
            </send>
         </inSequence>
      </target>
      <publishWSDL uri="file:repository/samples/resources/proxy/sample_proxy_1.wsdl"/>
   </proxy>
   <sequence name="ResponseChain">
      <clone>
         <target>
            <sequence>
               <property name="transport.vfs.ReplyFileName"
                         expression="fn:concat(fn:substring-after(get-property('MessageID'), 'urn:uuid:'), '_msg.xml')"
                         scope="transport"/>
               <property name="OUT_ONLY" value="true"/>
               <property name="transport.vfs.ContentType"
                         value="text/xml"
                         scope="transport"/>
               <property name="ClientApiNonBlocking" scope="axis2" action="remove"/>
               <send>
                  <endpoint>
                     <address uri="vfs:file:///home/shafreen/work/blog/in"/>
                  </endpoint>
               </send>
            </sequence>
         </target>
         <target>
            <sequence>
               <log level="custom">
                  <property name="SENDING EMAIL" value="SENDING EMAIL"/>
               </log>
               <property name="Subject"
                         value="ORDER PURCHASE CONFIRMATION"
                         scope="transport"/>
               <property name="OUT_ONLY" value="true"/>
               <property name="messageType" value="text/plain" scope="axis2"/>
               <property name="msgID" expression="get-property('MessageID')"/>
               <script language="js">var msgID = mc.getProperty("msgID");
        mc.setPayloadXML(&lt;h1&gt;For message id : {msgID}&lt;/h1&gt;);</script>
               <send>
                  <endpoint>
                     <address uri="mailto:shafreen@wso2.com"/>
                  </endpoint>
               </send>
            </sequence>
         </target>
         <target>
            <sequence>              
               <send/>
            </sequence>
         </target>
      </clone>
   </sequence>
   <sequence name="fault">
      <log level="full">
         <property name="MESSAGE" value="Executing default &#34;fault&#34; sequence"/>
         <property name="ERROR_CODE" expression="get-property('ERROR_CODE')"/>
         <property name="ERROR_MESSAGE" expression="get-property('ERROR_MESSAGE')"/>
      </log>
      <drop/>
   </sequence>
   <sequence name="main">
      <log/>
      <drop/>
   </sequence>
</definitions>
Now let's look into the details of this synapse configuration. Just to make it nice and concise I have broken this explanation into some sub topics. On more thing that worth mentioning is that I have used the sample 150 as the basis for this synapse configuration. So if you want get your hands dirty before go into the details just follow the sample and then do the necessary tweaks.

Axis2 Configurations

Before we do anything it is important un-comment the following sections in the axis2.xml which will enable the required transports.

VFS transport sender

<transportSender name="vfs" class="org.apache.synapse.transport.vfs.VFSTransportSender"/>

Mail transport sender

<transportSender name="mailto" class="org.apache.axis2.transport.mail.MailTransportSender">
    <parameter name="mail.smtp.host">smtp.gmail.com</parameter>
    <parameter name="mail.smtp.port">587</parameter>
    <parameter name="mail.smtp.starttls.enable">true</parameter>
    <parameter name="mail.smtp.auth">true</parameter>
    <parameter name="mail.smtp.user">email@host.com</parameter>
    <parameter name="mail.smtp.password">password</parameter>
    <parameter name="mail.smtp.from">email@host.com</parameter>
</transportSender>

Proxy service

First thing first, Whenever there is a request first it hits the in-sequence of the  proxy service. As you can see this proxy service doesn't do much. It simply sends the client's request to the back-end service. In this case it's the well-known SimpleStockQuoteService. However, there are few things to learn from it. First thing to notice is that it does not have a in-sequence but instead it has used message chaining. This is done by associating a receive sequence by adding to sends mediator's receive attribute. So now when there is a response it goes to this sequence. Then inside this sequence you do whatever you wanna do. So next section explains what happens inside the chained sequence.

Chained Sequence

In this example ResponseChain sequence is the chained sequence. As I said before, when there is a response the response goes through this sequence. So now let is what actions do occur when a response goes through this sequence. 

Firstly, it hits the clone mediator which will start three separate threads for each target with three cloned messages one for each. Therefore, these targets are independent from each other. So next part explains the first target.

First target 

Basically, this just save the response to a file. As you can see, transport.vfs.ReplyFileName property uses a unique file name for each message if not so previous message content would be replaced by the new message content. OUT_ONLY property makes sure ESB does not expect a response as we do not expect a response. transport.vfs.ContentType set the content type of the message. Though it is not that important in this case, it could vital when you send the message to a back-end service. Last but not the least, ClientApiNonBlocking property makes sure that Axis2 won't spawn a new thread for the out-going message. The reason for setting this is we already have spawned a thread as I explained earlier so there is no need to do so. Now that every thing is set we can write the file to the desired endpoint that is done by using the send mediator.

Second target 

This target just simply sends a confirmation e-mail. Since most of the properties quite intuitive, I am not gonna explain those properties. However, There is one thing to highlight and that is setting the messageType property. Based on how you have set this property receiver will decide either to have the message as an attachment or simply display it. Anyway, above settings cause the receiver to display message on the browser.

Third target 

Finally the third target completes the cycle by sending the response to the client who initiated the request. If this is not in place this client would not get any response from the ESB. So it's important place it there. 

That's about it for more information about the VFS transport try the below links.


    Blogger news

    Blogger templates

    Blogroll

    About