Mar 11, 2016

0 Comments
Posted in Arrangement , Art , Business

Write your own engine for WSO2 GW Core

Nowadays the ability to extend a given product is a key feature in software industry. The same applies for products such as GWs. There could be many reasons to extend a GW such as wiretapping the message, adding your own headers or even for applying custom security policies. WSO2 GW Core is designed with this notion in mind. It is written in such a modular way so that it can be extended at several key points. In fact, you can simply go ahead and plug your own engine to the GW even when the server is up and running. In this blog post I will be explaining how easy it is to write your own engine and plug it into WSO2 GW Core.

Before we start writing the engine, let’s have a look at the key components of WSO2 GW Core and how they are connected to each other.

High Level Architecture 


As you can see there are three main components and these components are organized in such a way so that we can separate the transport implementations from engine implementations. Each component’s responsibilities are as follows,

  • Carbon Transport component provides the transport implementation of the GW.
  • Carbon Messaging component provides the messaging capability to GW. Each component talks to each other using CarbonMessages that are provided by Carbon Messaging component. 
  • Carbon Message Processor provides whatever the required business logic implementation to GW such as header based routing, content based routing, etc. 
So, that is the build time logical and physical separation of components. Now let’s look at the interaction of each component at runtime.

OSGi Level Interaction


All right so, how does this architecture enable extensibility ? the answer to that question is explained in the next passage. We actually achieved that using OSGi declarative services. When the runtime starts Carbon Transport, it looks for a service reference of Carbon Message Processor implementation in the OSGi registry. This service reference is provided by the Carbon Message Processor bundle. Therefore, when you implement Carbon Message Processor interface, you must register its implementation as an OSGi service (you will see how it is done in the next section).

Because of this logical and physical separation of each component, we can shut down each region of the server without affecting any of the other components.

In addition to this service, there are several other OSGi services that can be used to extend the GW. I am not going into details of those as it would make this blog post too lengthy. Following diagram depicts the OSGi level interaction among each component.


White color texts represents the OSGi services that are registered by each component and the gold color text represents the services that are referenced by each component.

I think this basic background knowledge is enough to get you started. So, In this blog post we will be writing a simple Mock-Engine by extending CarbonMessageProcessor interface.

Writing a Simple Mock-Engine 


For the sake of clarity I will be explaining this in step by step manner.

Step 1 


Create a simple maven project. Then in the pom file there are a couple of things that we need to do. First we need to add the below dependencies to the project.

den.jpg

As you can see apart from OSGi dependencies all you need to add is this Carbon Messaging Dependency. In other words, the Mock-Engine is not dependending on any transport implementation.

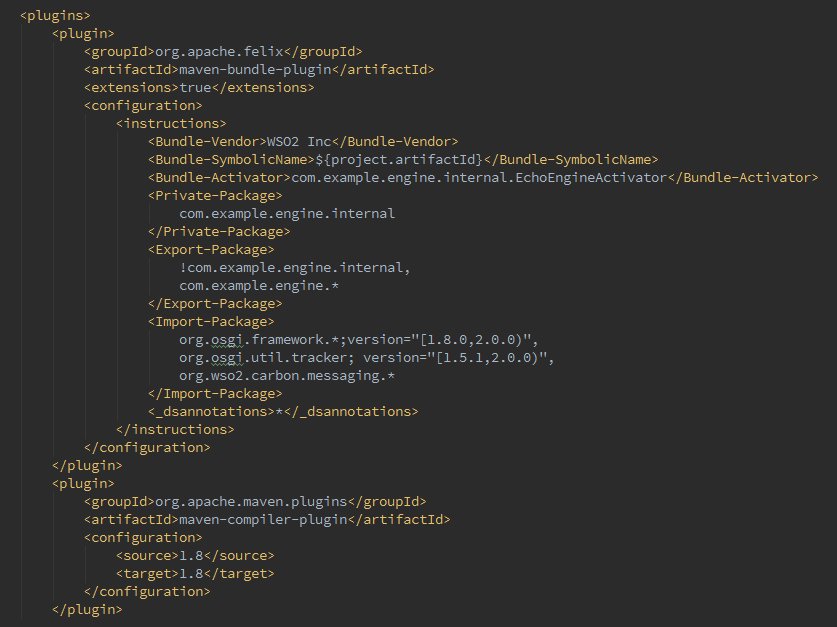
Secondly, you need to add maven-bundle-plugin and do the necessary OSGi configurations. One thing that you need to keep in mind is apart from importing and exporting packages, it is necessary to specify the bundle activator as well. You will see why in a minute. Following is the sample configurations for maven-bundle-plugin.

mvn-bundle.jpg

All right we are all set to move on to the second step.

Step 2


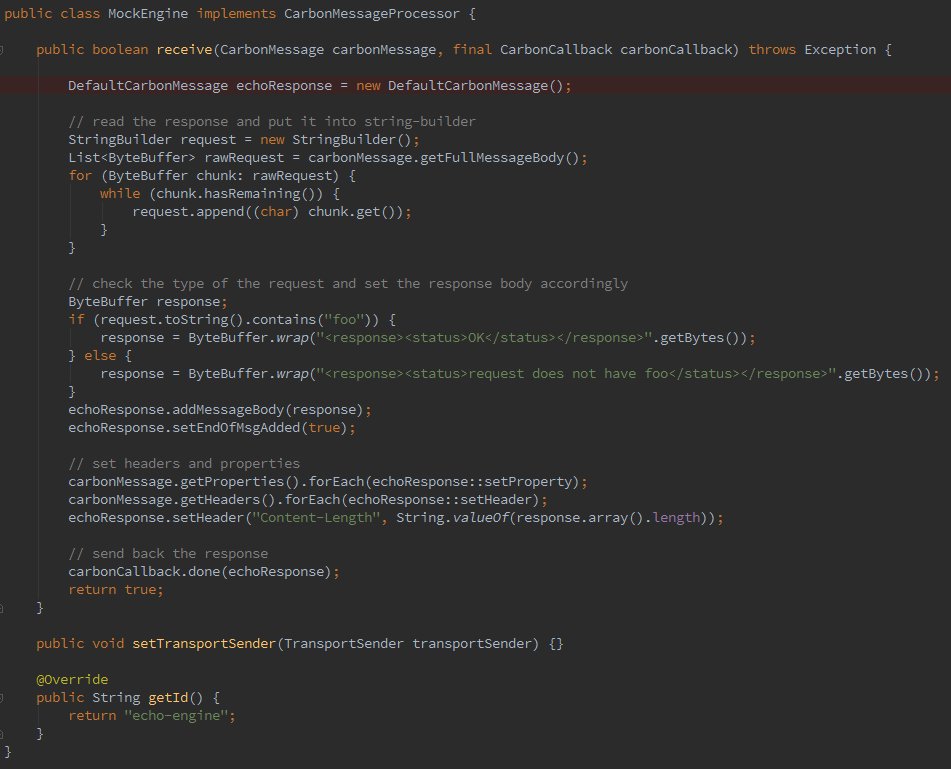
Now we can start writing our Mock-Engine. First we need to create a class that extends CarbonMessageProcessor interface. When you do so, you will have to implement three key methods. I will quickly explain what each method suppose to do.

public boolean receive(CarbonMessage carbonMessage, final CarbonCallback carbonCallback)

This is where the execution begins. When the Carbon Transport gets some message that message is transformed into a CarbonMessage and made available to the engine as a parameter of this method. Usually, a CarbonMessage includes a header section, a body section and a properties section.

Then in order to send back a response to the client we can use the CarbonCallback.

public void setTransportSender(TransportSender transportSender)

Eeven though this method is not implemented in this example. The responsibility of this method is to provide a sender to the engine. So that the engine can send messages to the back-end and get responses.

public String getId()

This method is simply used to provide a name for this engine. This name will be used internally to add and remove the engine dynamically from the runtime.

Now that you have some idea on CarbonMessaegProcessor interface, let’s see how it is implemented in the Mock-Engine.

mp.jpg

As you can see, it is very straight forward. It simply reads the content of the request CarbonMessage into a StringBuilder. Then based on the request content, it sends back the response using a new CarbonMessage. In this case, we simply check for foo in the request and send back the response accordingly. But you can implement any logic here. This was done simply for demonstration purposes.

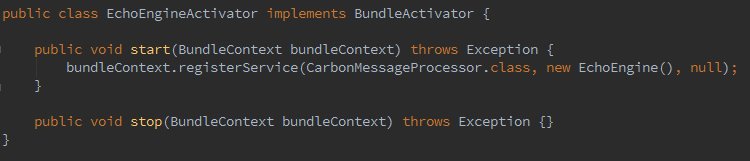
Once you have extended the CarbonMessagProcessor, there is only one last thing to do and that is to implement the bundle activator.

Step 3


In the OSGi bundle activator, we simply register this newly created engine as an OSGi service. This enables us to dynamically add and remove the engine from the runtime without restarting the GW. Following is the code you need to add.

osgi.jpg

That is it. Once you’ve put those pieces together, you can simply go ahead and build the project that will result in creating the Mock-Engine as an OSGi bundle. Now let’s try out the new engine.

Trying out The Engine 


Download the latest GW release from here. Start the GW in OSGi console mode. In order to do that find launch.properties and uncomment osgi.console= line. Afterwards, use carbon.sh to start the server.

Once the server is successfully started. Use the below command to install the new engine.

osgi> install file:/media/shafreen/source/echo-engine/target/mock-engine-1.0.0.jar

Upon successful installation, you should be able to see something like in the below image.


Now you can start the bundle with the below command.

osgi> start 48

Then using the stop command, we can stop the default engine as follows.

osgi> stop 36

That is it. You have successfully installed the new engine to the runtime. Now let’s send a request and see. Use the below command to try-out the new engine and you should get a 200 OK response.

curl -v localhost:9090 -H "Content-Type: application/xml" -d "<test/>foo</test>"

I hope this blog post helps you understand and get started with writing GW engines. I also want to thank Kasun and Senduran for helping me out with this blog.


Mar 15, 2015

0 Comments
Posted in Arrangement , Art , Business

Minimum steps to load balance WSO2 ESB with HTTPD Server

HTTPD server also knows as Apache2 server is a very commonly used server in many production environments. It is tested and trusted. This server has many usages and you can extend its functionality by installing modules like mod_proxy, proxy_connect, proxy_balancer and the list goes on. In this blog post I'll be showing how to use HTTPD server as a load balancer with minimum number of configuration steps. 

Install and Prepare the HTTPD server 

If you are using a Linux Debian distribution such as Ubuntu or Linux mint, you can simply install it by issuing the following command.
  • apt-get install apache2
Once the server is successfully installed you need to install mod_proxy related modules. In order to do that execute the following command. 
  • aptitude install -y libapache2-mod-proxy-html libxml2-dev
Now you just need to enable proxy_module, proxy_balancer_module and proxy_http_module. It can be done by executing the following command. 
  • a2enmod proxy
  • a2enmod proxy_balancer
  • a2enmod proxy_http
To verify if the modules are installed and enabled properly, use the following command.
  • apache2ctl -M | grep proxy

Configuring the cluster 

Following is the cluster setup we will be configuring.


Basically, what we are going to have is two WSO2 ESBs fronted by the HTTPD server. As you may have already noticed, I have used port offset 1 for ESB -1 and port offset 2 for ESB -2. You can change the port of each ESB by configuring below element of <ESB_HOME>/repository/conf/carbon.xml. 

<!-- Ports offset. This entry will set the value of the ports defined below 
to the define value + Offset.  e.g. Offset=2 and HTTPS port=9443 will
set the effective HTTPS port to 9445 -->
<Offset>1</Offset>

Likewise you can change the port offset to 2 for ESB -2 as well. Apart from these for testing purposes I have deployed the below Proxy service in each ESB. 


                  OK
                  1


Now that you have configured two WSO2 ESBs, let's look at how we can configure HTTPD server. It is very easy. Open the default configuration file for HTTP and add following configuration. The default configuration file is 000-default and it can be found under /etc/apache2/sites-enabled/

Just before the end of VirtualHost section you need to add the following two entries.

ProxyPass /httpd/ balancer://mycluster/
ProxyPassReverse /httpd/ balancer://mycluster/

Once that is done add the following configuration at the very top of (even before the VirtualHost section) 000-default file.

<Proxy balancer://mycluster>
    # Define back-end servers:
    # Server 1
    BalancerMember http://localhost:8281/
    # Server 2
    BalancerMember http://localhost:8282/
</Proxy>

Now save the file and restart HTTPD server. This can done by executing the following command.
  • sudo service apache2 restart
After restarting the server start the two WSO2 ESBs. Once the servers are started use the following request to see if the cluster is working.
  • curl -v http://localhost/httpd/services/MyMockProxy
Upon successful configuration you should be able observe that load is getting equally distributed among the two servers. Each time a server gets a request, there should be a log message in the console as below.

[2015-03-15 16:03:54,073]  INFO - LogMediator To: , MessageID: urn:uuid:4a6e90ae-de16-4828-b416-176250a269d9, Direction: response, HIT = HIT

Yep, It is that easy to load balance WSO2 ESBs with HTTPD server. To learn more about HTTPD server you can refer to the below links. 

[1] https://www.digitalocean.com/community/tutorials/how-to-use-apache-http-server-as-reverse-proxy-using-mod_proxy-extension
[2] http://httpd.apache.org/docs/2.2/mod/mod_proxy.html
[3] http://wiki.centos.org/HowTos/Https
[4] http://httpd.apache.org/docs/2.2/mod/mod_proxy_balancer.html


Aug 10, 2014

0 Comments
Posted in Arrangement , Art , Business

Hazelcast clustering with WSO2 carbon servers in 20 minutes - part 2

Since first part of this blog post explains about clustering concepts, I would rather directly start this blog post with configuring the servers. The primary focus of this blog post is to show the interaction of well-known-members and rest of the other members. This knowledge is a must to have if you are working with any clustered deployment. Any behavior of this cluster is more or less influenced by the implementation of Hazelcast. Therefore, knowing Hazelcast would always provide you an extra support.

Deployment diagram 

Let's start with the deployment diagram. For this deployment I will be using four ESB instances and two of which would be well-known-members where as the other two are dynamic members. Yes, this is not a real world production deployment but an ideal deployment to understand any production deployment. 


Wondering why two WKAs ?

All right, now you must be wondering why there are two well-known-members and two ordinary members. For a given cluster, it is best  that if we can make all the members as well-known-members. You'll get to know why later. However, this is not practical in reality and as a result we will have to have both dynamic and static members (well-known-member). 

Therefore, we have to elect few members as well-known-members and for this cluster I have elected two well-known-members. This is mainly to avoid single point of failure. Without well-known-members there is no way a new node to join a cluster. So in this case, if one well-known-member goes down still we can keep our cluster pretty much alive as we have another. 

As a rule of thumb, it is always better to have as many WKAs as possible. So, you have the luxury to point dynamic members to well-known-members as many as possible. The higher the well-known-members, the higher the availability.

Configuring the servers

Configuring the well-known-members

Let's start configuring the well-known-members. The only file you have to touch in order to do this is the axis2.xml. Yes, that is the only file. Following is the configuration snippet of the well-known-member 1. 


   true
   
   
   wka
   
   wso2.esb.domain
   
   45564
   100
   60

   
   127.0.0.1

   
   4100


         127.0.0.1
         4200


I have removed all the default comments and added some new comments to guide you guys through the configurations. Now, we can start well-known-member 1. Since, I have used the same machine for the complete deployment, to start well-known-member 2 all I have to do is changing the localMemberPort port to some unique value. I have changed it to 4200 as follows.


4200

Needless to say when you start multiple carbon servers in the same machine you have to set the port offset. For this deployment, I opted to start the sever with sh  ./bin/wso2server.sh -DportOffset=1. However, there is something you need to know. Changing the port offset does NOT impact localMemberPort

Upon successful start you should be able to see something similar to the following in the console.
[2014-08-10 21:55:33,921]  INFO - WKABasedMembershipScheme Member joined [3e823e7e-e897-4625-abb9-7b6c3cca8d1f]: /127.0.0.1:4100
[2014-08-10 21:55:35,963]  INFO - MemberUtils Added member: Host:127.0.0.1, Remote Host:null, Port: 4100, HTTP:8280, HTTPS:8243, Domain: wso2.esb.domain, Sub-domain:__$default, Active:true

Configuring the Dynamic-members

We just have to follow the same step changing the localMemberPort to configure the dynamic members. But there is one additional step to do. In the members list we have to mention about the WKAs. Doing this automatically makes the other two members as WKAs. There is no other special configuration to make a member a WKA member. Following code snippet shows how to do this. 


      127.0.0.1
      4100
   
   
      127.0.0.1
      4200
   

All right that is about it. You have your own Hazelcast cluster with WSO2 carbon servers. Now you can enhance the cluster by adding the following,

  • A external GREG to share common resources between all the members in the cluster.
  • A deployment synchronizer to synchronize artifacts among other members.
  • A load balancer to rout the load to each member of this cluster. 
To learn more on WSO2 product clustering see [1].

Jul 27, 2014

0 Comments
Posted in Arrangement , Art , Business

Hazelcast clustering with WSO2 carbon servers in 20 minutes - part 1

Introduction 

While we were at customer site, we were bombarded with above subject. We almost chocked ourselves answering those questions. So, I though of writing a blog post based on the experience  and the knowledge I gained during my on-site engagement. This blog post explains everything you need to know about Hazelcast clustering in a production deployment. 

Why do we need clustering

In a typical enterprise deployment we don't deploy a single instance of a given server as it could result in a single point of failure i.e if the deployed server goes down the complete system will be unusable. Thus we always tend to deploy multiple instances of a given server in order to increase the Availability of a system. 

However, this is only one aspect of this. The other aspect of this is Scalability of a given deployment. In modern enterprise systems a single server instance is not enough to cater the number of incoming request. Therefore, in order to scale we always add more instances to the existing system. This is called Horizontal scaling. Though we could also upgrade server specs such as increasing the memory and CPU speed in order to scale (which we call vertical scaling), there is always a limit and whether we like it or not we have to add more instances to scale.

So it is obvious that we need to have multiple instances of a given server in an enterprise deployment. Needless to say adding more instances adds more complexity to the system. In order to be consistent regardless of numbers servers you've added, you may have to replicate the state and make servers communicate with each other and that is where clustering comes to picture.

Clustering Concepts

Membership discovery phase

When you add a new node to an existing system, it has to convert itself to a member of the existing cluster. A member of a cluster knows about each other in the cluster, which allows that member to change its state to match with other core-existing members. There are two mechanisms to become a member of a cluster. A node can either use Well Known Address (WKA) mechanism or Multicast mechanism. Now what are these ?

Multicast mechanism 

In Multicast a node advertises its details to others using a multicast channel. All the other members get to know about the new node through this multicast channel, which allows them to start communicating with the new node. This allows the node to a become member in the cluster. However, Multicast is not preferred for production deployments as it could add an unnecessary overhead to the network. As a result, it is more often use for testing purposes. 


Well Known Address (WKA) mechanism

In WKA there is a set o well known members and everybody knows about these members. When a node wants to become a member of the cluster, it connects to one of the well known members and declare its details. Then the well known member provides all the information about the cluster and let every member in the cluster know about the new node. This allows the node to become a member of the cluster. This is the widely used membership discovery mechanism in clustering.


Static vs Dynamic membership 

A cluster deployment could have static, dynamic or hybrid members. In a static clustered setup there is a fix set of members and it is not possible to add a new member to the cluster without restarting the system. IP address and port number of static members are predefined.  In a Dynamic clustered setup we can always add new members to the system without restarting. However, in Hazelcast we always use a hybrid clustered setup where we have both static and dynamic set of members. Static members are the well known members who have a predefined IP and port. 

Member's view

Each member in the cluster has its own view of the cluster. Once it discovers the members of a cluster it keeps track of these members. Normally, this is done by maintaining a heart-beat pulse between other members. This way when a member goes down it could detect it and remove that member from the healthy list. However, this is also called unreliable failure detection as members may not respond to the heart-beat request due to the load on that member and not because it is really down. 

Clustering domains

This may not come under general clustering concepts but rather specific to WSO2. In order to identify a cluster we label it with a domain name. Clustering messages will only be sent to the members of that particular domain. In addition to that, this way we can route the traffic only to the relevant set of instances.  For example, let's say there is a load balancer fronted with multiple cluster domains of ESB and BPS. Load balancer will look into the domain mapping and route the message to the specific cluster domain. Therefore, ESB requests are isolated from BPS requests and vise versa. 

Now that you have a basic idea about the concepts of clustering, in part 2 I'll be discussing how to configure WSO2 carbon servers using Hazelcast. 

Mar 15, 2014

0 Comments
Posted in Arrangement , Art , Business

WireTap : An Enterprise Integration Pattern with Message Store and Message Processor

I've always wondered why we needed Sampling Processor when you have Forwarding Processor. Because at first glance it feels like you can do everything that you do with Sampling Processor by using Forwarding Processor. But that is not true. I came-across an interesting integration that made use of Sampling Processor and Forwarding Processor in order to wiretap incoming messages. In fact there is a separate Enterprise Integration Pattern (EIP) for this called Wirtap and this blog post explains a comprehensive implementation of it. In addition to that, as you go through the blog post you will also get to know the nuts and bolts you need to know about Message Store and Message Processor of WSO2 ESB

Requirement : Wiretap It

Basically, what we are trying to archive with this solution is to enable wiretapping for a given Proxy-service with minimal intrusive configurations and performance loss. In simple English, we need to listen to the incoming messages seamlessly. Proxy-service continues to do its intended job while we keep on listing (just like FBI does). Err.. why are we listening ? you ask, this could due to many reasons such as understanding the incoming request, validating it, etc.

Application of Message Store/Message Processor

Here comes the interesting part, the implementation of the above requirement. Let's start with a diagram that depicts the implementation. This will give the initial idea that would make it easier to get a grasp of what I am talking in the next paragraph.  


As you can see there are two Message Stores first one for the Sampling Processor and the second one for the Forwarding Processor. Here's what have done,

  1. Take a copy of the incoming message and store it in a message store. This is done with the clone mediator and the store mediator.
  2. Then takes the message using the sampling processor and do necessary modifications to the message such as adding authentication headers, base64 encoding, etc. Then stores it in the second message store. 
  3. Lastly, take the modified message out using the Forwarding Processor and send it reliably to the back-end. In this case it is a Apache CouchDB
Following is the Synapse configuration of the above design. 

   
      15000


The main sequence for the message mediation org.apache.activemq.jndi.ActiveMQInitialContextFactory tcp://localhost:61616 JMSMS 1.1 org.apache.activemq.jndi.ActiveMQInitialContextFactory tcp://localhost:61616 1.1 JMSMS1 10 storeForward 4 true 1000 10 true

You may wonder why go through such complex implementation. Imaging, you add all the wiretapping logic in the original proxy. It would obviously hinder its original task. The Proxy would get slow which in turn reduces the number of clients it can serve. Moreover, developers will get confused with the original Synapse logic with the new intrusive wiretapping Synapse logic. So that is why this is the better way. 

You can use this Synapse configuration in any given Proxy of yours to start wiretapping (Before that you will have to copy necessary jar files to lib directory). Finally, This also shows the capabilities of WSO2 ESB. An ESB that not only support conventional Enterprise Integration Patterns (EIP) but also novel EIPs such as this. For list of EIPs that WSO2 ESB covers, look at here


Feb 21, 2014

0 Comments
Posted in Arrangement , Art , Business

ESB Performance Round 7.5 - The Other Side of The Story


This blog post explains why the message corruptions stated in “ESB Performance Testing - Round 7” and “Why the Round 6.5 results published by WSO2 is flawed” article are not so catastrophic. Moreover, As you go through the post you’ll understand the fact that, it is written in an absurd manner with overly exaggerated statements. However, with this blog post I don’t really intend to play the same game of theirs but to clear any possible misunderstandings that were caused by those articles. 

Fastest open source ESB in the world


Latest performance study conducted by WSO2 ESB team has clearly showed that WSO2 ESB has continued to be the leader in the space of ESB performance. Geared with latest technology and a dedicated team, WSO2 ESB always provides nothing but the best for its users. Following graph shows the summary of the latest results. For more information please refer Performance round 7.5.


However, There have been some invalid critics on the Net which gives the message that WSO2 ESB fails to deliver. This message is entirely not true and below paragraphs explain why. 

The extinct issue of StreamingXpath 


We must admit that enabling StreamingXpath did lead into a message corruption when the message size is larger than 16K. While there was a real issue here, this was never a default configuration and has NOT really affected the thousands of real deployments of WSO2 ESB out there. Furthermore, this has been stabilised in the recently released WSO2 ESB 4.8.1 as it continues to be the fastest open source ESB.

XSLT and FastXSLT false alarm


XSLT and FastXSLT mediators never had a problem of message corruption. The message corruptions that were seen in Performance round 7 were due to a missing Synapse configuration. Given the fact that, the engineers who conducted the performance test were ex-WSO2 ESB team engineers, they could have easily figured it out and fixed it during the Performance round 7. Plus, they could have informed us about this prior to the test. So that we could have fixed it for them. 

They failed to do neither of these. So, as they have mentioned, their peformance test does have inherent limitations due to their limited understanding. Therefore, it cannot be attributed as a message corruption of WSO2 ESB 4.6 or WSO2 ESB 4.7.0. 

Stability of Passthrough Transport (PTT)


Over the last year WSO2 ESBs with PTT were deployed in many customer sites and they have never encountered any significant issues but rather benefited from high performance of deployed ESBs as the deployment only required very few instances of ESBs. 

To clear any confusions PTT never had message corruption problems but instead StreamingXpath which is written on top of PTT in order to utilize its high performance architecture.

Nothing to Worry


After all, As above section explains message corruptions that were discussed in performance round 7 are either occurs in extreme situations or never really exist. Therefore, we believe the content of the article performance round 7 is more or less misleading the audience. However, StreamingXpath did have a problem with messages larger than 16K which is fixed in ESB 4.8.1. Apart from that there aren’t any message corruptions issues at all.

Lastly, The only other critic that worth answering is why we didn’t publish the AMI. Yes, we didn’t publish the AMI but we did publish the configuration files along with clean and clear instructions to re-setup setup if needed. So, If one wants to reproduce the result they can simply re-setup the setup. Besides, Even if we had published the AMI, one would have to load this AMI into an EC2 instance which is always not guaranteed to be the same. 

As a conclusion, Most of the things that have been published in those articles are trivial stuff and just overly exaggerated to make a big thing out of nothing. However, I must admit some of the critics they have mentioned were really helpful for us to improve our product and I am grateful to them for those.

Feb 14, 2014

0 Comments
Posted in Arrangement , Art , Business

Advancing Integration Competency and Excellence with the WSO2 Integration Platform


I am glad that WSO2Con Asia 2014 is held in Sri Lanka. Undoubtedly, It is like the biggest SOA (Service Oriented Architecture) conference that ever held in Sri Lanka. Not only you get to learn anything and everything about SOA but also you get to learn it with hands-on sessions. We all know that best way to learn something is to try it out yourself. So, this is the very best reason why you should attend the tutorial session on "Advancing Integration Competency and Excellence with the WSO2 Integration Platform" done by Dushan and Shammi

Mainly, this tutorial session will be focused on the followings,
  • New WSO2 ESB Cloud Connectors
  • New RESTful Integration capabilities
  • Store and Forward and advanced integration patterns
These are some of the latest additions that were done to our ESB. If you find these words unfamiliar, don't worry!. Because you will get to learn from the best. Just to get you started, I'll give a brief introduction on main topics. 

Let's start with WSO2 ESB Cloud Connectors


Here, the million dollar question would be what is a cloud connector ? right. In a sentence "A connector is a ready made and convenient tool to reach publicly available Web API’s". For instance, we have connectors for SalesForce, Google Spreadsheet, Twitter, etc. These connectors allow you to do rapid and easy integration of different APIs to meet business needs. For instance, you can take data from SalesForce and present it Google SpredSheet in minutes. There is no need to write a single code. In fact, it is just a matter of drag and drop from DevStudio. Furthermore, If you don't like these connectors you can write your own connectors. So, in this tutorial you will get use and write connectors. 

New RESTful Integration capabilities


REST is like the next big thing when it comes to integration. Not only it is simple and easy with its "verbs" and "nouns" but also it gives you the liberty of using fat free message types such as JSON, POX, etc as opposed to Web Services. In this tutorial session you will find out that how easy it is to do integration in RESTful manner using WSO2 ESB. To make your life even more easier, the new versions of ESB has enhanced JSON support such as Natural JSON and JSON path. Thefore, this is a tutorial session that shouldn't be missed.

Store and Forward and advanced integration patterns


Though Store and Forward support has been there for some time. We though of revamping its implementation from scratch to cater the modern needs in integration. Store and Forwarding not only helps you to throttle messages but also to archive guaranteed delivery. With this you can do advance EIPs (Enterprise Integration Pattern) such as DLC (Dead Letter Channel) and many more. Moreover, you will get hands-on experience on new features of Store and Forward and its usage in EIPs.

These are the main focuses of this tutorial session. So get involved and you will start to see a set of whole new possibilities in the space of Integration. This could take your organization to the next level. Remember, this is only about a tutorial session. There are series of interesting sessions lined up in WSO2Con Asia 2014. For more information see WSO2Con Asia 2014 official website.


    Blogger news

    Blogger templates

    Blogroll

    About